Ready to Print Artwork
“The principles of true art is not to portray, but to evoke” – Jerzy Kosinski
Ready to Print Artwork aka Camera Ready Artwork is any graphic file created using images and/or text which adheres to requirements specific to a given print project.
Images for printing or promotional merchandise include logos, icons, photos, graphics, et.al. in a digitize format. Text may be from a specific font family or mixed fonts either common or obscure.
Graphic File Formats
Preferred graphic file formats are *.PDF, *.PSD, *.AI, *.EPS. Marginally acceptable graphic file formats are *.JPG, *.TIF, Unacceptable graphic file formats are *.GIF, *.PNG, *.PUB
For printing, graphic files need to be converted to CMYK mode. Artwork submitted in RBG mode will be converted which can affect printed colors.
CMYK vs RGB Color Modes
Computer monitors (desktop or laptop) display images in RGB (Red Green Blue) color mode, great for web sites and emails, but not an exact representation of a printed item.
Printing uses CMYK (Cyan Magenta Yellow Black) color mode so designing images for printing should be done in CMYK color mode.
Therefore, graphic files should be submitted in CMYK color mode. To get the closest match of how your print job will look when printed then design your graphic images in CMYK color mode.
Artwork submitted in RGB mode will be converted to CMYK color mode which can affect the printed colors. After this conversion the Reds, Greens, and Blues lose value which leads to some color deviation, so the graphic image doesn’t look the same as on your monitor.
Hint: The PANTONE ColorMunki Smile delivers super-simple monitor calibration for laptops or desktop monitor. Easily calibrate computer monitors to see colors correctly.
Print Resolution
The correct minimum print resolution depends on the print project. Most print projects require 300dpi (dot per inch).
Large format printing, such as banners, sometimes only need a print resolution of 150dpi. Some promotional merchandise items require as much as 600dpi to capture fine detail.
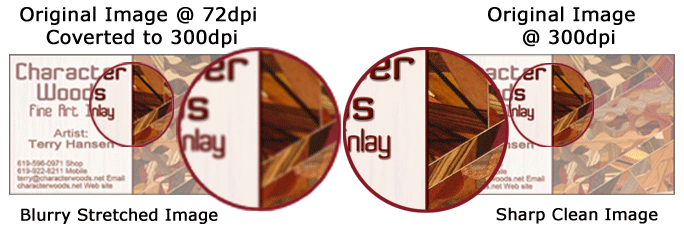
Internet graphics resolution is 72dpi so usually the graphic files are too small or low resolution to be printed clearly. During prepress all graphic files are resized 300dpi so lower resolution images will be “stretched out,” blurring the image.

Other Artwork Design Specifications
What is a Bleed? What is the Image / Text Safe Area?
A “Bleed” is the area of a graphic image that extends past the trim line of a printed item and is removed during trimming.
A “Safe Area” is where images and text stay within. Usually 1/8” to 1/4″ inside the trim line, depending the print project.
Safe Areas are mainly used in offset and digital printing but can also apply to some promotional merchandise.

Whatever the printed item’s finished size it is important to design the graphic image with at least an 1/8″ bleed; some printed items may require a 1/4″ or greater bleed.
For example, a 2″ x 3.5″ business card the image should be 2.25″ x 3.75″ leaving a 1/8″ bleed area beyond the trim line.
For example, a 4″ x 6″ postcard the image should be 4.25″ x 6.25″ leaving a 1/8″ bleed area beyond the trim line. When designing an image keep in mind the “safe area” 1/8″ inside the trim line.
Final Thoughts
If the graphic images submitted are considered unusable print projects will stalled until usable graphic images are submitted.
Submitting graphic images so they meet required specifications will help assure timely production and delivery of both printing and promotional merchandise projects.
Researched and Complied by: Michael T Grewe, SMarketing Founder, a San Diego, California based company that offers graphic design service, printing and promotional products.


Leave a Reply
Want to join the discussion?Feel free to contribute!